·
Name the project PasswordChange, select Java as
a Project Technology. Click Next.
·
Name the Default Package as Changepwd. Click Finish.
·
Create a new Java class file called Changepwd.
Aşağıdaki sorguyu Changepwd.java içine yapıştırıyoruz.
Weblogic hostname, port, kullanıcı adı ve şifreyi kendimize
göre düzenliyoruz.
package Changepwd;
import java.io.IOException;
import java.net.MalformedURLException;
import javax.jws.WebMethod;
import javax.jws.WebService;
import javax.management.MBeanServerConnection;
import javax.management.ObjectName;
import javax.management.remote.JMXConnector;
import javax.management.remote.JMXConnectorFactory;
import javax.management.remote.JMXServiceURL;
import java.util.HashMap;
import java.util.Hashtable;
import javax.naming.Context;
@WebService
public class Changepwd
{
private static
JMXConnector jmxConnector = null;
private static MBeanServerConnection
mBeanServerConnection = null;
private static
String webLogicHostname = "XX.XXX.XXX.XXX"; // Set to the weblogic
host
private static
String webLogicPort = "7001"; // Set to the port of the admin server
on the weblogic instance
private static
String webLogicUsername = "weblogic"; // Set to the weblogic admin
user
private static
String webLogicPassword = "weblogic şifremizi giriyoruz"; // Set to the password of the
weblogic admin user
private static
final String validationFailed = "[Security:090237]";
private static
final String mustBeEightChars = "[Security:090285]";
private static
final String missingSpecialChars = "[Security:099116]";
public Changepwd()
{} // for JAXB
@WebMethod(exclude
= true)
public String
changeUserPassword( String userId, String oldPassword, String newPassword,
String confirmPassword ) throws Exception
{
ObjectName
securityMBeanName = new ObjectName("Security:Name=myrealmDefaultAuthenticator");
Object
objUser[] = new Object[]{(userId), (oldPassword), (newPassword) };
String
objStr[] = new String[]{("java.lang.String"),
("java.lang.String"), ("java.lang.String") };
try
{
if ( confirmPassword.equals(newPassword) )
{
mBeanServerConnection.invoke(securityMBeanName,
"changeUserPassword", objUser, objStr);
return
"Şifreniz başarıyla güncellendi.";
}
else
{
return
"Yeni şifreler uyuşmuyor.";
}
}
catch
(Exception e)
{
if(
e.getCause().getMessage().contains( validationFailed ) )
return
"Eski şifrenin doğrulanması başarısız.";
else if (
e.getCause().getMessage().contains( mustBeEightChars ) )
return
"Parola en az 8 karakter uzunluğunda olmalıdır.";
else if (
e.getCause().getMessage().contains( missingSpecialChars ) )
return
"Parola en az 1 numara veya özel karakter içermelidir.";
else
return
"Şu anda şifre sıfırlanamıyor. Lütfen bir yönetici ile iletişime
geçin";
}
}
@WebMethod(exclude
= true)
public static void
initConnection(String hostname, String portString) throws IOException,
MalformedURLException
{
Integer
portInteger = Integer.valueOf(portString);
int port =
portInteger.intValue();
String mserver
= "/weblogic.management.mbeanservers.runtime";
JMXServiceURL
serviceURL = new JMXServiceURL("service:jmx:iiop:///jndi/iiop://" +
hostname + ":" + port + mserver);
Hashtable h =
new Hashtable();
String[]
credentials = new String[] {webLogicUsername, webLogicPassword };
h.put("jmx.remote.credentials", credentials);
jmxConnector =
JMXConnectorFactory.connect(serviceURL, h);
//jmxConnector
= JMXConnectorFactory.connect(serviceURL);
mBeanServerConnection = jmxConnector.getMBeanServerConnection();
}
/*@WebMethod(exclude = true)
public static void
main(String[] args) throws Exception
{
}*/
public String
passwordChange( String userId, String oldPassword, String newPassword, String
confirmPassword ) throws Exception
{
Changepwd c =
new Changepwd();
initConnection(webLogicHostname, webLogicPort);
String result = c.changeUserPassword( userId,
oldPassword, newPassword, confirmPassword );
jmxConnector.close();
return result;
}
}
·
Right Click on your main class and select Webservice Properties.
·
Select the default (Java EE 1.5, with support for JAX-WS Annotations), and
click on Ok.
·
Select Methods and confirm that the method passwordChange is
selected and click Ok.
·
Let’s now deploy the web service to the Weblogic server. Right Click on the
project and click Deploy –> Webservices
·
Select Deploy to Application Server. Click Next.
·
Click  to add a connection to the Weblogic server. Name it LocalWeblogic.
Note: This guide walks through setting up your local weblogic server, but
you can easily replace your local info with the main server info you want the
WAR deployed to.
(Burada LocalWeblogic
yerine istediğimiz bir şeyi yazabiliriz)
Username
alanına system yerine weblogic yazıyoruz.
Localhost yerine kendi hostumuzu yazıyoruz.
·
Select the Application Server you just added, in our case LocalWeblogic.
Click Next.
Burada LocalWeblogic
yerine ne yazdıysak onu tıklayıp ileri diyoruz.
·
Select the second radio button, Deploy to selected instances in the
domain. Make sure to check only the BI_cluster, not the AdminServer.
Leave Deploy as a standalone Application selected. Click Next.
Then click Finish.
·
A new tab in Jdeveloper should appear at the bottom of the screen
called Deployment. Monitor here for a successful deployment
message. This can take a few minutes.
OBIEE 11g Steps
The following steps take place from within
OBIEE. They will create a simple Agent to invoke the webservice deployed above,
and then create a hidden dashboard page to be a launch point for the agent.
Obiee 11g ye admin
kullanıcı ile login oluyoruz.
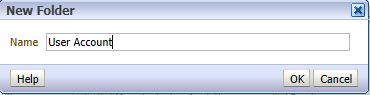
Paylaşılan Klasörler altında User Account adında yeni bir
klasör yaratıyoruz.
(User Account yerine başka bir isimde verebilirsiniz.)
·
Select the radio button for Add content later (Create empty
dashboard). Click Ok.
Yeni bir dashboard oluşturuyoruz.
·
Click on the Catalog link, and navigate to the newly created folder, User
Account.
·
Select Permissions to set the appropriate permissions on
the new folder, BI Administrator should have Full Control. BI
Consumer should have Open.
o
Make sure that Apply permissions to sub-folders and Apply
permissions to items within folder are both selected.
·
Click Ok.
·
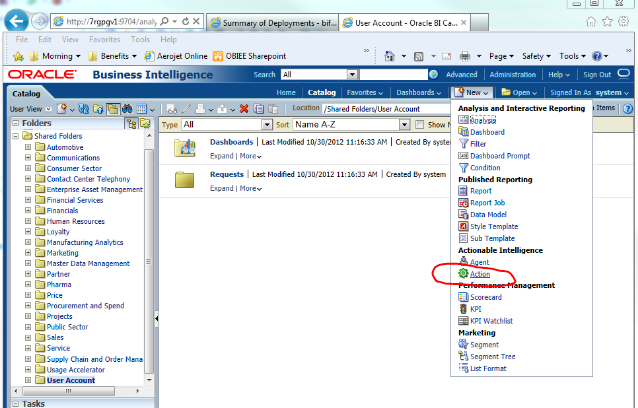
From the New menu in the OBIEE global navigation,
select Action.
·
Choose Invoke Web Service from the popup menu.
·
Plug in the WSDL and click Open.
o
The URL would look like: http://<weblogic host>:<obiee
port>/<package name>-<project name>-context-root/<package
name>Port?WSDL
o
On my local, it is: http://localhost:9704/Changepwd-PasswordChange-context-root/ChangepwdPort?WSDL
·
Drill down until you can select passwordChange, and select it.
Click Ok.
Localhost yerine weblogic hostumuzu yazıyoruz.
·
This opens up a new dialog box, enter the following values for the prompts
(no quotes):
o
passwordChange_arg0 = "Username:"
o
passwordChange_arg1 = "Old Password:"
o
passwordChange_arg2 = "New Password:"
o
passwordChange_arg3 = "Confirm Password:"
·
For the Username argument, for Value select Session
Variable, then type in USER and mark it as fixed and hidden.
o
This will force the password change to only work for the current logged in
user.
·
Click the Options button to personalize the messages
(again, no quotes):
o
Set Dialog Title to "Change Password"
o
Set Action Help Text to "Please enter your existing
password and new password below."
o
Set Execute Button Text to "Change Password"
o
Leave all other options blank.
·
Click on the Action Results tab and enter the parameters
for the return messages (again, no quotes):
o
Set Dialog Text to "@{passwordChangeResponse}"
o
Create one XPath variable:
§
Name: passwordChangeResponse
§
XPath Expression: Body/passwordChangeResponse/return
o
Set Dialog Title to "Result"
·
Click Ok. Click Save Action.
·
Save the action as Change Password into the User
Account Shared Folder you created above.
·
Navigate to your newly created Dashboard, User Settings. Edit
the dashboard by placing a new section. In that section, add a text item. Place
the following into the text item (making sure to check the Contains
HTML Markup box):
Text dosyasının içine
aşağıdaki kodu atıyoruz.
<script
type="text/javascript">
document.getElementById("idPageOptions").style.display
= "none";
</script>
Şifre değiştirme
ekranına hoşgeldiniz.<br><br>
Kullanıcı adınız:
<b>@{biServer.variables['NQ_SESSION.USER']}</b>.<br><br>
Şifrenizi değiştirmek
için lütfen aşağıdaki linke tıklayınız.
·
Click Ok. Edit the Column Properties. Click on Custom
CSS Style Options (HTML Only) and add the following to the Use
Custom CSS Style:

position:absolute;height:120px;
margin-top:40px;
·
Click Ok.
·
Drag an Action Link below your text item in that same section. Name the
link Change Password, and navigate to the saved Action Link you
saved to the Shared Folder. Don’t define any values, just click on the Ok button.
·
Click Ok to close the Action Link Properties window.
·
On the main section properties, unselect Collapsible.
Additionally, from the Section Properties, set the border position to None.
·
Click the  icon to save the dashboard.
Click the
icon to save the dashboard.
Click the  icon to view the results.
·
Click on Catalog. Navigate back to the new User Account folder
you created. Select the folder, and then select Properties. Select Hidden,
then click Ok.
OBIEE
Server Steps
The following steps take place on the OBIEE server. All
files references are for a Linux/Solaris install, but file locations will be
similar for Windows.
·
Update the following files, to place a link to the Change
Password in the header bar:
o
/apps/applobi/OBIEE11g/Oracle_BI1/bifoundation/web/app/res/b_mozilla/header.js
o
/apps/applobi/OBIEE11g/user_projects/domains/bifoundation_domain/servers/bi_server1/tmp/_WL_user/analytics_11.1.1/7dezjl/war/res/b_mozilla/header.js
·
For these two files, find the line:
b.push(new obips.ContextMenu.MenuOption(saw.header.getLocalizedString("kmsgHeaderMyAccount"),"",null,new
obips.Callback(this,this.onMyAccount)));
·
and replace it with:
b.push(new obips.ContextMenu.MenuOption(saw.header.getLocalizedString("kmsgHeaderMyAccount"),"",null,new obips.Callback(this,this.onMyAccount)));b.push(new obips.ContextMenu.MenuOption(saw.header.getLocalizedString("kmsgHeaderCustomURL"),"",null,new obips.Callback(this,this.onCustomURL)));
·
then find the line:
saw.header.NavBar.prototype.onMyAccount=function(){saw.header.Menubar.getManager().hidePopupPanel();var a=new saw.ondemandload.FuncProxy("obips.AccountInfo.launchDialog",{messageTemplate:"kuiMyAccountDialogHead"});a.exec()};
·
and replace it with:
saw.header.NavBar.prototype.onMyAccount=function(){saw.header.Menubar.getManager().hidePopupPanel();var a=new saw.ondemandload.FuncProxy("obips.AccountInfo.launchDialog", {messageTemplate:"kuiMyAccountDialogHead"});a.exec()};saw.header.NavBar.prototype.onCustomURL=function(){var w = 1920, h = 1080; if (document.all) { w = document.body.clientWidth;h = document.body.clientHeight;x = window.screenTop;y = window.screenLeft;} else if (document.layers) { w = window.innerWidth;h = window.innerHeight;x = window.screenX;y = window.screenY;} var popW = 450, popH = 276;var leftPos = ((w-popW)/2)+y, topPos = ((h-popH)/2)+x;window.open('saw.dll?PortalPages&PortalPath %2Fshared%2FUser%20Account%2F_portal%2FUser%20Settings','passwordresetwindow','toolbar=no, menubar=no, scrollbars=no, resizable=no,location=no, directories=no, status=no, width='+popW+',height='+popH+',top='+topPos+',left='+leftPos);};
·
Note: Replace the bold part with the path to the location you saved the
Action Link in OBIEE above.
- Update the following file to
add the resource id
- /apps/applobi/OBIEE11g/Oracle_BI1/bifoundation/web/msgdb/common/saw.header.xml
- For this file, add the
following line:
<resource
id="kmsgHeaderCustomURL" />
·
The next file will not exist out of the box, and needs to be created, along
with any folders along the way.
o
/apps/applobi/OBIEE11g/instances/instance1/bifoundation/OracleBIPresentationServicesComponent/coreapplication_obips1/msgdb/l_en/customMessages/uicmsgs/saw.header.xml
·
For this file, you will be creating it, so make the contents:
<?xml version="1.0" encoding="utf-8"?>
<webmessagetables xmlns:sawm="com.siebel.analytics.web/message/v1">
<webmessagetable lang="en-us" system="saw.header" table="Messages">
<webmessage name="kmsgHeaderCustomURL"><text>Change Password</text></webmessage>
</webmessagetable>
</webmessagetables>
·
Restart the OBIEE services. You should now see a link under the User menu
called Change Password. This will open a new window providing the
user with simple instructions to change their password.